


Showing posts with label a. Show all posts
Showing posts with label a. Show all posts
Wednesday, March 5, 2014
Make a wood doormat and make money
This project began as a germ of an idea. My wife took a picture of a rustic door mat she found that was made entirely out of sticks. I had never thought about wood doormats, so I looked online to find some precedent. Turns out, there are many.
Door mats are expensive!
But what caught my interest the most were the prices being charged: typically between $100 and $200 each.
 I mulled it over a while to see if I could design something just as durable, yet easy and inexpensive to make. My first thought was to essentially make a miniature version of a deck. The problem here is that I didnt want to have to attach the individual planks with screws, which would look unpleasant. Plus, spacing the boards would be difficult: if they are even slightly askew, it would be blatantly apparent on such a small scale.
After many sketches, I finally came up with an elegant way to build this. It solves the problem of screwing in planks, and allows for expansion and contraction. But the best part: the board cost me $12. The only other supplies needed are two steel rods and 30 flat washers from the plumbing department. Total cost: $24. Ill bet you could sell these for over $100. If you use teak, you could double the price. Hey, why not try making some extra cash?
Read More..
Door mats are expensive!
But what caught my interest the most were the prices being charged: typically between $100 and $200 each.
After many sketches, I finally came up with an elegant way to build this. It solves the problem of screwing in planks, and allows for expansion and contraction. But the best part: the board cost me $12. The only other supplies needed are two steel rods and 30 flat washers from the plumbing department. Total cost: $24. Ill bet you could sell these for over $100. If you use teak, you could double the price. Hey, why not try making some extra cash?

Sunday, March 2, 2014
A Corner in the Living Room

For a while now Ive been gradually working on a corner in our living room. You may remember the shelves we recently hung to give some structure to a large bare wall. Adjacent to the wall with the shelves was yet another space I needed to fill.
Our living room updates have included a new ceiling, new trim, new ceiling light fixture, new drapery and fresh paint. Ive tried to keep the rest of the updates minimal and inexpensive. With that in mind, I needed to make our existing furniture work. After finding a furniture arrangement that I liked, I brought our originally black console table over to this wall.
BEFORE:
BEFORE:

I knew the right piece to hang above the table would be a mirror, so I took a trip to our local antique mall to take a look. I found this mirror for $20. It was heavy, obviously old with a solid wood frame and back. I knew I would have to paint the frame so that it stood out against the wood walls, but after thinking about it for a few days, I realized it would be perfect and went back to buy it.

I first painted a light coat of BM Titanium (the same gray I used for the shelves), then a light coat of Annie Sloan Chalk Paint Coco, lightly sanded and finished with clear ASCP wax. I was so pleased with how it turned out and was thrilled that my husband had to agree (especially since he tried to talk me out of buying it - smile).
BEFORE:

The following week I went to work on our generic console table, which we purchased as newlyweds.

The truth is... I painted too many coats on this piece to count. I just could not get it to look right! Finally I ended up painting BM Titanium over ASCP Coco, and finished with both ASCP dark wax and ASCP clear wax.

The neutral colors really pop against the wood walls and hopefully help to create a look that is soothing and cohesive. You may have heard me mention before that the wood walls are original to our home... as hard as it has been for me to decorate this room, I really wanted to try and embrace that rustic element.

Originally I had planned on buying a couple lamps to set on either side of the mirror, but Justus had the suggestion of buying oil lamps, and I was instantly smitten with the idea. In our old house, we dont have many outlets and its also nice to have a source of light when the power goes out. I bought these nearly identical lamps at our local antique store. All we had to do was add lamp oil - fun!

Slowly the corner was coming together. Then last week my dad came over and brought me some antlers he had found on their farm. I knew immediately they would complete the look I was going for and hung them above the mirror.

In actuality, our sofa sits in front of the console table. Weve had this red sofa for nearly nine years (another newlywed purchase) and will likely have it for another nine (smile), so that was certainly another reason for opting to keep the background decor simple and neutral.
Sometimes I feel like there is still so much to be done in our home, but tonight when I happened across "before" photos of our living room and our entire house, it was so rewarding to see that we actually have accomplished a lot. Yes, there are still many improvements that need to be made, but I feel like I need to be more thankful for what we do have and recognize that it doesnt all happen overnight.
With that being said, were looking forward to starting on some outdoor projects tomorrow we hope to accomplish before spring, and one of those is a chicken coop! Today was rainy and overcast (hence the bad photos), but if we see sunny skies, well be getting started.
Hope you have a wonderful weekend!
Sharing at Miss Mustard Seed
Sunday, February 23, 2014
A BARN GEM white washed dove grey table
The neighbors had a yard sale early this month,
and of course we scurried over to take a peek.


This little guy musta been hidden in their barn for a
bit of time, but was now time for a new home


..... AND A NEW LIFE!


The only products I used to achieve this look were
primer, stain, and a finish wax.

primer, stain, and a finish wax.
If anyone would like to
see a post on how I accomplished it let me know
below and Ill be happy to write a tutorial
with photos I took during the project.
UPDATE: tutorial can be found here:
*JUST PRIMER AND SOME WAX*
Joining the ladys at:

UPDATE: tutorial can be found here:
*JUST PRIMER AND SOME WAX*
Joining the ladys at:
Thursday, February 20, 2014
Making a Spoon for Eating Discussion plans and photos
Hi Everyone,
Next Tuesday is my oldest sont birthday and as hes a historical re-enactor who plays the part of a young soldier in battle, I was trying to think of something that I could make for him. It occurred to me that he might like a spoon to eat with. I think lots of soldiers loose their kit in battle and probably wind up with no eating utensils and have to make something like a spoon to eat with until they can get a replacement. So here we go, were off to make an eating spoon.
Eating spoons are a little different from cooking spoons in that they are smaller, shorter in length, and the handle is contoured to make it easy to get the bowl of the spoon around the face and into the mouth. This does present a few difficulties-the spoon has to be small in size and this can lead to breakage and the contouring has to be done on a bandsaw. But by working carefully and slowly, we can get around those problems. And if we make it out of some hardwood, it shouldnt break.
Ive got some maple scrap from previous spoon projects so well make our spoon out of that.
Here we go:
I decided to use an ordinary spoon out of my cutlery drawer as a pattern for this spoon:

As the handle for this is very curvy, I sketched out the handle on the side of the board and proceeded to cut it out on the bandsaw:

In these next two photos you can see the face of the spoon blank and a side view of the blank:


Here is the blank with a patten of the spoon drawn on to it:

Here is the entire thing in a vice. Im going to cut out the bowl first:

Here is one half of the bowl carved out:

And Ive turned the blank around and carved out the other half:

This is the finished bowl. Its shallow on the narrow end and deeper on the wide end, just like a regular spoon is. Now to cut it out on the bandsaw:

Here is a side view:

This is the face view with the entire spoon cut out from the blank. You can see how very rough it is:

I spent the next 40 minutes or so filing, sanding, and carefully carving on the spoon. Here it is at this point:


I kept on sanding and filing, being careful not to bend the handle or the bowl of the spoon so as not to break it and I must say its coming out rather well:


Here we are about 20 minutes later. Its much smoother after more sanding and it is usable as an eating spoon. I normally sand spoons very smooth and Im debating whether or not to sand this one. It needs to look like something made in the field. I am going to put a brief birthday message on the underside of the bowl with a burning pen. It wont be seen and it will have my sons name on it so if he loses it, it will make its way back to him....hopefully.

The inside of the bowl could stand a little more sanding so Im going to go back out to the shop and do that and then Ill oil with flaxseed oil so stay tuned for another photo or two.
More late,
VW
Read More..
Next Tuesday is my oldest sont birthday and as hes a historical re-enactor who plays the part of a young soldier in battle, I was trying to think of something that I could make for him. It occurred to me that he might like a spoon to eat with. I think lots of soldiers loose their kit in battle and probably wind up with no eating utensils and have to make something like a spoon to eat with until they can get a replacement. So here we go, were off to make an eating spoon.
Eating spoons are a little different from cooking spoons in that they are smaller, shorter in length, and the handle is contoured to make it easy to get the bowl of the spoon around the face and into the mouth. This does present a few difficulties-the spoon has to be small in size and this can lead to breakage and the contouring has to be done on a bandsaw. But by working carefully and slowly, we can get around those problems. And if we make it out of some hardwood, it shouldnt break.
Ive got some maple scrap from previous spoon projects so well make our spoon out of that.
Here we go:
I decided to use an ordinary spoon out of my cutlery drawer as a pattern for this spoon:
As the handle for this is very curvy, I sketched out the handle on the side of the board and proceeded to cut it out on the bandsaw:
In these next two photos you can see the face of the spoon blank and a side view of the blank:
Here is the blank with a patten of the spoon drawn on to it:
Here is the entire thing in a vice. Im going to cut out the bowl first:
Here is one half of the bowl carved out:
And Ive turned the blank around and carved out the other half:
This is the finished bowl. Its shallow on the narrow end and deeper on the wide end, just like a regular spoon is. Now to cut it out on the bandsaw:
Here is a side view:
This is the face view with the entire spoon cut out from the blank. You can see how very rough it is:
I spent the next 40 minutes or so filing, sanding, and carefully carving on the spoon. Here it is at this point:
I kept on sanding and filing, being careful not to bend the handle or the bowl of the spoon so as not to break it and I must say its coming out rather well:
Here we are about 20 minutes later. Its much smoother after more sanding and it is usable as an eating spoon. I normally sand spoons very smooth and Im debating whether or not to sand this one. It needs to look like something made in the field. I am going to put a brief birthday message on the underside of the bowl with a burning pen. It wont be seen and it will have my sons name on it so if he loses it, it will make its way back to him....hopefully.
The inside of the bowl could stand a little more sanding so Im going to go back out to the shop and do that and then Ill oil with flaxseed oil so stay tuned for another photo or two.
More late,
VW
Monday, February 10, 2014
A Box for Blocks
For my sons first birthday I made him the Skunk Bench. For his second, Im making him a set of blocks. Of course, I hadnt been working on the blocks for very long when I realized that they would need a place to live. Bam! New project!
I decide to make a chest. I looked through Lon Schleinings excellent book Treasure Chests and saw several "sea chests" that inspired me. Of course, I had to change things; its what I do.
Some changes come from my design muse, some from problem solving during the construction process. I like it when the changes provide a certain amount of "funky" or "quirky" character to a piece - it keeps things interesting. Ive posted about this before.
I sketched out a rough design and went with a raised panel bottom set in grooves in the sides and ends. On a chest this size, I think it would be more common, and arguably better - as it would have not stolen from the depth of the interior, to just nail on a solid bottom. But I liked the idea and how it makes the box different.
Once I started building, a couple of other changes appeared. First I didnt have wide enough stock to make the top out of one board, and rather than gluing up wider stock, I modified the top design completely. Then, after numerous attempts at modifying the handle hardware, I threw it away keeping only the bails; and replaced the mounting hardware with simple eye screws. All the hardware I blackened with a linseed oil patina that I first experimented with back on the Turning Saw project. After seeing the blackened hardware sitting on the raw wood of the box, I liked it so much I abandoned my original idea of painting the box.
After deciding not to paint the box, I also decided to leave the nails exposed, and to use wrought head nails to attach the hinges. This was the first time Id used the clench nail technique, and I had mixed results. The nails I had were either too short or too long. As nails that are too short are not clenchable, I went with the too long option - but things got messy. In the end, it worked, but it was not pretty...
One special thing about this project for my son was that I used a tool with family history. Its a hand drill from our hardware store, that my father gave me as a boy. I love the idea that there is a three generation connection in this project.
In the end, I think I created a functional box for the blocks, but one that has just the right amount of unique character to make it extra special for my son.


And finally, the traditional shot of the tool kit used on this project:

Not pictured: shooting board and miter box.
a custom walnut sideboard

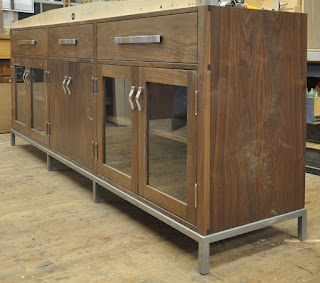
all done 1/15 ... off to long island

heres the story ..


Subscribe to:
Posts (Atom)