Showing posts with label and. Show all posts
Wednesday, March 5, 2014
Make a wood doormat and make money
This project began as a germ of an idea. My wife took a picture of a rustic door mat she found that was made entirely out of sticks. I had never thought about wood doormats, so I looked online to find some precedent. Turns out, there are many.
Door mats are expensive!
But what caught my interest the most were the prices being charged: typically between $100 and $200 each.
I mulled it over a while to see if I could design something just as durable, yet easy and inexpensive to make. My first thought was to essentially make a miniature version of a deck. The problem here is that I didnt want to have to attach the individual planks with screws, which would look unpleasant. Plus, spacing the boards would be difficult: if they are even slightly askew, it would be blatantly apparent on such a small scale.
After many sketches, I finally came up with an elegant way to build this. It solves the problem of screwing in planks, and allows for expansion and contraction. But the best part: the board cost me $12. The only other supplies needed are two steel rods and 30 flat washers from the plumbing department. Total cost: $24. Ill bet you could sell these for over $100. If you use teak, you could double the price. Hey, why not try making some extra cash?
Read More..
Door mats are expensive!
But what caught my interest the most were the prices being charged: typically between $100 and $200 each.
After many sketches, I finally came up with an elegant way to build this. It solves the problem of screwing in planks, and allows for expansion and contraction. But the best part: the board cost me $12. The only other supplies needed are two steel rods and 30 flat washers from the plumbing department. Total cost: $24. Ill bet you could sell these for over $100. If you use teak, you could double the price. Hey, why not try making some extra cash?
Tuesday, March 4, 2014
Dowel center finding jig and some Christmas woodworking ideas
Heres a quick little jig that Bill Wilson (the Cajone king) made for centering dowel holes on the edge of a board. Just two dowels and a hole all lined up. Place the dowels on each side of an edge and drill through the center hole. Voilà !


Read More..
And since its gift-building season, Bill also sent over a picture of a project he built. The snow is flour.
*****
Heres another gift idea...a slit drum. Dave Hecker says his biggest woodworking challenge is getting wood into his basement...it has to go through the house to get there! Slit drums are fun projects.
*****
Kenneth Hockenberry posted this most incredible video over on Facebook today. (If youre not signed up the the Mere Mortals Facebook page, check it out. Lots of really cool discussions, sometimes about wood, sometimes about football on Sundays. Plus, if you arent there, we talk about you behind your back.)
At any rate, there is so much that is cool about this video, I wont spoil anything before you watch.
Thursday, February 20, 2014
Making a Spoon for Eating Discussion plans and photos
Hi Everyone,
Next Tuesday is my oldest sont birthday and as hes a historical re-enactor who plays the part of a young soldier in battle, I was trying to think of something that I could make for him. It occurred to me that he might like a spoon to eat with. I think lots of soldiers loose their kit in battle and probably wind up with no eating utensils and have to make something like a spoon to eat with until they can get a replacement. So here we go, were off to make an eating spoon.
Eating spoons are a little different from cooking spoons in that they are smaller, shorter in length, and the handle is contoured to make it easy to get the bowl of the spoon around the face and into the mouth. This does present a few difficulties-the spoon has to be small in size and this can lead to breakage and the contouring has to be done on a bandsaw. But by working carefully and slowly, we can get around those problems. And if we make it out of some hardwood, it shouldnt break.
Ive got some maple scrap from previous spoon projects so well make our spoon out of that.
Here we go:
I decided to use an ordinary spoon out of my cutlery drawer as a pattern for this spoon:

As the handle for this is very curvy, I sketched out the handle on the side of the board and proceeded to cut it out on the bandsaw:

In these next two photos you can see the face of the spoon blank and a side view of the blank:


Here is the blank with a patten of the spoon drawn on to it:

Here is the entire thing in a vice. Im going to cut out the bowl first:

Here is one half of the bowl carved out:

And Ive turned the blank around and carved out the other half:

This is the finished bowl. Its shallow on the narrow end and deeper on the wide end, just like a regular spoon is. Now to cut it out on the bandsaw:

Here is a side view:

This is the face view with the entire spoon cut out from the blank. You can see how very rough it is:

I spent the next 40 minutes or so filing, sanding, and carefully carving on the spoon. Here it is at this point:


I kept on sanding and filing, being careful not to bend the handle or the bowl of the spoon so as not to break it and I must say its coming out rather well:


Here we are about 20 minutes later. Its much smoother after more sanding and it is usable as an eating spoon. I normally sand spoons very smooth and Im debating whether or not to sand this one. It needs to look like something made in the field. I am going to put a brief birthday message on the underside of the bowl with a burning pen. It wont be seen and it will have my sons name on it so if he loses it, it will make its way back to him....hopefully.

The inside of the bowl could stand a little more sanding so Im going to go back out to the shop and do that and then Ill oil with flaxseed oil so stay tuned for another photo or two.
More late,
VW
Read More..
Next Tuesday is my oldest sont birthday and as hes a historical re-enactor who plays the part of a young soldier in battle, I was trying to think of something that I could make for him. It occurred to me that he might like a spoon to eat with. I think lots of soldiers loose their kit in battle and probably wind up with no eating utensils and have to make something like a spoon to eat with until they can get a replacement. So here we go, were off to make an eating spoon.
Eating spoons are a little different from cooking spoons in that they are smaller, shorter in length, and the handle is contoured to make it easy to get the bowl of the spoon around the face and into the mouth. This does present a few difficulties-the spoon has to be small in size and this can lead to breakage and the contouring has to be done on a bandsaw. But by working carefully and slowly, we can get around those problems. And if we make it out of some hardwood, it shouldnt break.
Ive got some maple scrap from previous spoon projects so well make our spoon out of that.
Here we go:
I decided to use an ordinary spoon out of my cutlery drawer as a pattern for this spoon:

As the handle for this is very curvy, I sketched out the handle on the side of the board and proceeded to cut it out on the bandsaw:

In these next two photos you can see the face of the spoon blank and a side view of the blank:


Here is the blank with a patten of the spoon drawn on to it:

Here is the entire thing in a vice. Im going to cut out the bowl first:

Here is one half of the bowl carved out:

And Ive turned the blank around and carved out the other half:

This is the finished bowl. Its shallow on the narrow end and deeper on the wide end, just like a regular spoon is. Now to cut it out on the bandsaw:

Here is a side view:

This is the face view with the entire spoon cut out from the blank. You can see how very rough it is:

I spent the next 40 minutes or so filing, sanding, and carefully carving on the spoon. Here it is at this point:


I kept on sanding and filing, being careful not to bend the handle or the bowl of the spoon so as not to break it and I must say its coming out rather well:


Here we are about 20 minutes later. Its much smoother after more sanding and it is usable as an eating spoon. I normally sand spoons very smooth and Im debating whether or not to sand this one. It needs to look like something made in the field. I am going to put a brief birthday message on the underside of the bowl with a burning pen. It wont be seen and it will have my sons name on it so if he loses it, it will make its way back to him....hopefully.

The inside of the bowl could stand a little more sanding so Im going to go back out to the shop and do that and then Ill oil with flaxseed oil so stay tuned for another photo or two.
More late,
VW
Wednesday, February 19, 2014
Bread Cooling rack and Mothers Day Wood Turning Marathon
Hi Everyone,
Well the weather has finally cleared and its actually really pleasant outside this afternoon. And that means a couple of hours in the wood shop is the way to go.
I have needed some stuff in my own kitchen-a cutting board to replace my old scrap maple board that Ive been using forever, a big salad bowl to use when friends come over, and a cooling rack for baking. Ill work on the cutting board a little later on but the cooling rack I did this afternoon and here it is:

As for the salad bowl, well, this segues into a brief word about the upcoming Mothers Day Wood Turning Marathon. I have two blocks of wood: a block out of laminated pine and another 10"x4" block of solid wood that I have no idea what it is. So Im going to turn one of them into a salad bowl for myself.
Im still not sure which Ill use but Ill make up my mind by midweek and post discussion and plans. In the mean time Ill clean up my shop, sharpen everything and get ready to go!
See you Wednesday,
VW
Read More..
Well the weather has finally cleared and its actually really pleasant outside this afternoon. And that means a couple of hours in the wood shop is the way to go.
I have needed some stuff in my own kitchen-a cutting board to replace my old scrap maple board that Ive been using forever, a big salad bowl to use when friends come over, and a cooling rack for baking. Ill work on the cutting board a little later on but the cooling rack I did this afternoon and here it is:

As for the salad bowl, well, this segues into a brief word about the upcoming Mothers Day Wood Turning Marathon. I have two blocks of wood: a block out of laminated pine and another 10"x4" block of solid wood that I have no idea what it is. So Im going to turn one of them into a salad bowl for myself.
Im still not sure which Ill use but Ill make up my mind by midweek and post discussion and plans. In the mean time Ill clean up my shop, sharpen everything and get ready to go!
See you Wednesday,
VW
Monday, February 17, 2014
Do it Yourself Woodworking Some Tips and Ideas to Start Your Own Woodworking Project

Do it yourself woodworking projects are fun activities that you can do at home and a good alternative to buying brand new furniture. It is also a good way to restore old furniture or make something new out of your furniture that has been stuck in your garage for long. It just takes a little creativity and you can do many projects by yourself.
Even if it is just your first time to do it on your own, you can however find some great resources that you will find useful in making your do it yourself woodworking project successful. You may however start with some simple projects to make it easier to complete. However, here are some tips that you might also find useful in your woodworking project.
-Your choice of wood. One of the things that you may need to decide when starting on a woodworking project is the wood to use. You can choose either softwood or hardwood in your projects or any kind of species depending also of the project you are making. Most often, hardwoods are used for indoor projects like cabinets or furniture and softwood are often for outdoor projects. In fact, softwoods are even used as lumber in most construction projects as they are easy for construction especially when you are using woodworking tools. If you are just starting, it may be wise to start with softwoods to make your project a little easier for you.
- Sanding your wood is also important as this creates a smooth finish to your woodworking project, makes your project durable from wear and tear, and of course allows your painted project to be long-lasting. One of the most important tips in sanding your wood is to go with the grain. Going against it will create marks on your wood and may not look good with the finish or the paint. Also start with the coarse-grit sandpaper down to the finer ones.
- In choosing your woodworking finish, make sure you are using something that fits your do it yourself woodworking project. There are different choices of finish and each of them have distinct properties - oil, varnish, urethane, wax, shellac, lacquers, make sure you know what is best for your project. If you want a tint of orange to your finish product, shellac may be a good choice to enhance the appearance of dark-colored woods. If you are doing an outdoor project, varnish may be suitable for you as this finish is resistant to moisture and solvent and also protects the wood from scratches.
One great tip if you are just starting out with a do it yourself woodworking project is to start with something that you are comfortable working, and from there, you can learn more tips and techniques in your woodworking. It is also important to be extra careful in working with your tools especially in working with your lathes, and make sure you got good quality tools especially if you are looking forward to more woodworking projects in the future.
Even if it is just your first time to do it on your own, you can however find some great resources that you will find useful in making your do it yourself woodworking project successful. You may however start with some simple projects to make it easier to complete. However, here are some tips that you might also find useful in your woodworking project.
-Your choice of wood. One of the things that you may need to decide when starting on a woodworking project is the wood to use. You can choose either softwood or hardwood in your projects or any kind of species depending also of the project you are making. Most often, hardwoods are used for indoor projects like cabinets or furniture and softwood are often for outdoor projects. In fact, softwoods are even used as lumber in most construction projects as they are easy for construction especially when you are using woodworking tools. If you are just starting, it may be wise to start with softwoods to make your project a little easier for you.
- Sanding your wood is also important as this creates a smooth finish to your woodworking project, makes your project durable from wear and tear, and of course allows your painted project to be long-lasting. One of the most important tips in sanding your wood is to go with the grain. Going against it will create marks on your wood and may not look good with the finish or the paint. Also start with the coarse-grit sandpaper down to the finer ones.
- In choosing your woodworking finish, make sure you are using something that fits your do it yourself woodworking project. There are different choices of finish and each of them have distinct properties - oil, varnish, urethane, wax, shellac, lacquers, make sure you know what is best for your project. If you want a tint of orange to your finish product, shellac may be a good choice to enhance the appearance of dark-colored woods. If you are doing an outdoor project, varnish may be suitable for you as this finish is resistant to moisture and solvent and also protects the wood from scratches.
One great tip if you are just starting out with a do it yourself woodworking project is to start with something that you are comfortable working, and from there, you can learn more tips and techniques in your woodworking. It is also important to be extra careful in working with your tools especially in working with your lathes, and make sure you got good quality tools especially if you are looking forward to more woodworking projects in the future.
Tuesday, February 11, 2014
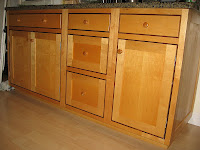
Maple and Walnut Kitchen
Shaker style wall and base cabinets with a little flair -
Walnut contrasting band in all door and drawer openings give this timeless style a modern look. Four piece crown molding finishes the upper cabinetry to the ceiling, also highlighted by a walnut band.
Thursday, January 23, 2014
ebay find before and after

a little before and after here. a client brought us the chair below. it had a lovely mousey bouquet about it and some really funky red fabric, but the bones were good, and the hardware was complete and functional. our friend isaiah at bespoke upholstery carefully disassembled it, saving the original fabric and frames for patterns .. the headrest is finished and will be reunited with its chair tomorrow. click the photos to enlarge them ..

and i happen to have on hand a skin of maine chili pepper leather from universal leather company that the client thought was perfect for it.

we sanded the walnut veneer lightly and touched up the black painted edges. we then gave it to our friend steve holman and he sprayed a little lacquer on it to freshen up the shine and get rid of the mouse odor.

pretty righteous upholstery work by isaiah ...

parts and patterns .. we made two new frames for the seat and back upholstery .. all the foam and burlap was replaced too.
very cool upholstery foundation design. obviously a factory chair. i tried to find one like it on google images but no luck ... info anyone?

very nicely laminated frame. i have no idea how they did that ... lots of pressure somehow. its kind of folded into shape.


the client asked us to reinforce the base so we added a 14 gauge plate
between the swivel and the seat. good to go ..
update 5/31
update 5/31

Monday, January 13, 2014
woodworking plans potato and onion bin
For you woodworking plans potato and onion bin its good
Potato and onion bin free plans | joel blog, Potato and onion storage bin potato and onion storage containers free potato bin plans – potato and onion.every wood shop can produce a wood potato bin that is. Potatoe and onion bin woodworking plans and information at, This is your woodworking search result for potatoe and onion bin woodworking plans and information at woodworkersworkshop®.